How to Make Cakes with Edible Photos
Published by Nanni on Sunday, July 22, 2012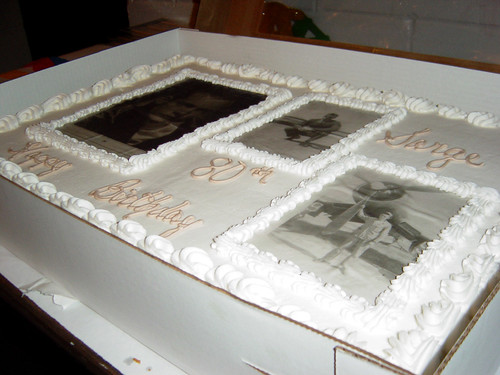
Photo credit by DerekSteen
Everyone at one time or another has either seen or bought a cake that had some sort of picture on it as decoration. It is a fun and creative way to liven up that ordinary birthday cake or add some romance to an anniversary cake. You name it, there’s cake out there that is waiting for a photo to be put on it.
If you aren’t one for making the cake yourself, there are a multitude of places on the Internet that can help you make the cake of your dreams, or you can go to your local bakery and provide them with the image or images that you want on the cake.
If you decide to try making one on your own, probably the quickest way would be to create your own images. In order to do this though, you will need the proper supplies for creating edible images. You’ll need a printer that is especially designed for edible images. You’ll also need icing sheets and icing ink. The special printers will hold between two and eight cartridges, and what you use depends on how elaborate that you want the photos to be.
These specialty printers act like your ordinary every day machines that hook up to your computer. They react the same way when you pick a picture or design that you want printed. The only difference is that it’s made out of icing instead of ink. The prices for these types of printers vary from low end to extremely expensive systems. Even with the low end, you need to decide whether or not you will be doing this often. If not, it may not be cost effective for you to create these cakes on your own.
A very popular way to add edible images to your cakes is to do what they call the butter cream transfer. This is a fun and inexpensive way to create charming photo designs for your cakes. The best way of doing this is to find the picture that you want to put on the cake and then trace this photo onto some wax paper. The picture has to be in reverse of course so that it looks correct once positioned onto the cake. After the design is on the wax paper, you would then fill it in with the different colors of frosting that you want for the best result. Then it’s put into the freezer until it is easy to handle. After that, put the image onto the cake with the wax paper side up. Afterwards the wax paper can be removed and the picture will be on the cake.
Another way to do something similar to this would be find your picture that you want to use from a coloring book or something similar. You will want to have the picture as a mirror image, you might want to print it off of your printer in reverse image to make the job easier. After you have achieved the mirror image, place a piece of wax paper onto the image. Trace the design with a black food pen or with some black icing gel. Once you have finished tracing the image onto the wax paper, turn the wax paper immediately over and decide where you want to place it, then gently rub the image onto the cake. Then you can fill it in with the colors that you want for your picture.
 | Posted in »

0 comments: Responses to “ How to Make Cakes with Edible Photos ”